Overview
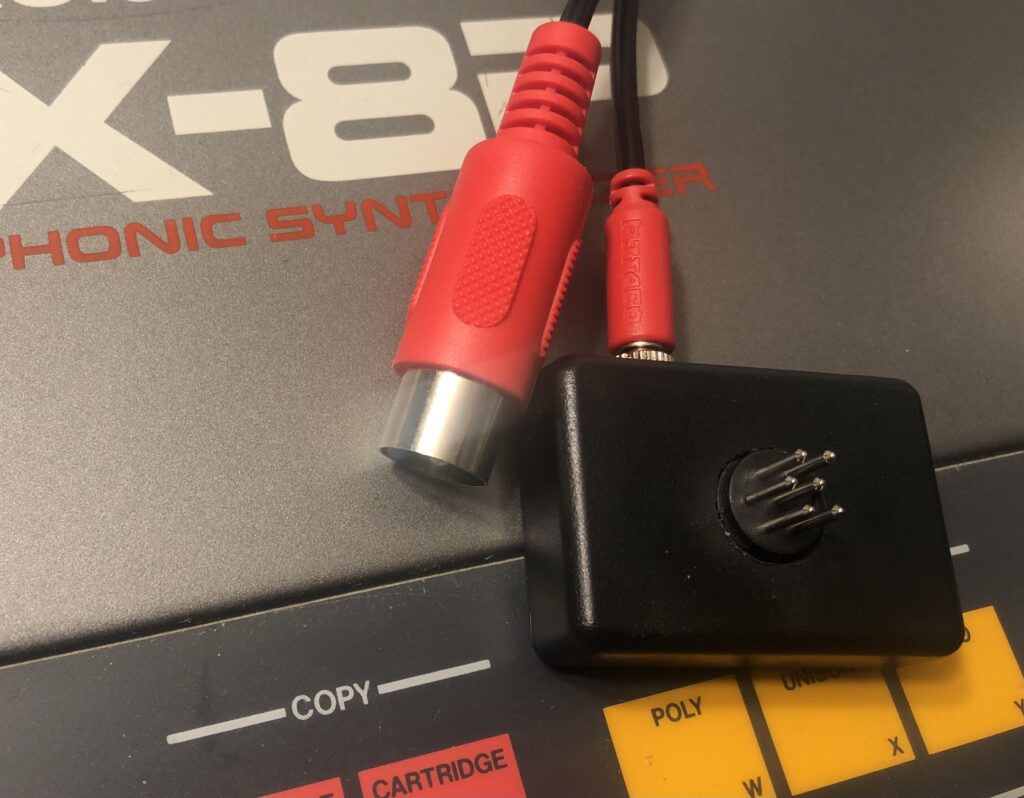
The mp-800 is a “programmer” for the Roland JX-8P, JX-10 and MKS-70 synthesizers. It is a very small box that converts incoming MIDI CC messages to the Roland programmer format. This solution let you use any MIDI controller that can send MIDI CC messages.
It also has a number of extra magic and features according to the feature-list below.
When you turn a knob on the MIDI controller, it will send a MIDI CC message to your DAW in the computer. When you have configured your DAW-project correctly, the DAW will send out the incoming MIDI CC to the mp-800. The mp-800 will convert the incoming MIDI CC to the format that the Roland JX synth requires and change the requested parameter.
If you don’t want to use a computer and DAW, you must exchange that with a MIDI Host device. The MIDI Host device will do the same routing as the DAW, that is; receiving MIDI input from the MIDI controller and sending it to the mp-800.
You can use the MIDI controller of your liking, but it is of course good if it at least has the number of knobs for the parameters you want to control.
The Novation Launchcontrol XL works very well because it has 24 rotary knobs, 8 faders and 24 buttons that can be used.
Featurelist
The mp-800 has the following features:
- Support for all the parameters of the original programmer.
- The “switch”-parameters that have 2-4 fixed levels, can be controlled with momentary buttons instead. Each press of a button cycles the parameter to the next value. When it reaches the maximum parameter, it starts over from the lowest/first value again.
- Based on MIDI CC messages (not sysex).
- Save and Load up to 32 user patches in non-volatile memory.
- 64 Built in presets.
- Randomize function (all or single parameters).
- 8 predefined “Macros” that changes multiple parameters at the same time from one CC.
- 8 user defined “Macros” with up to 4 parameters each. Each of the 4 parameters can also be inverted or have user defined ranges.
- 8 user defined “Snaps” which is snapshots of up to 4 parameters and their values.
Connection
The device has a male connector built in on the backside. You connect the device to the PG-800 programmer connector on your synthesizer. It will communicate with the JX via this connector and it will also get power from there.
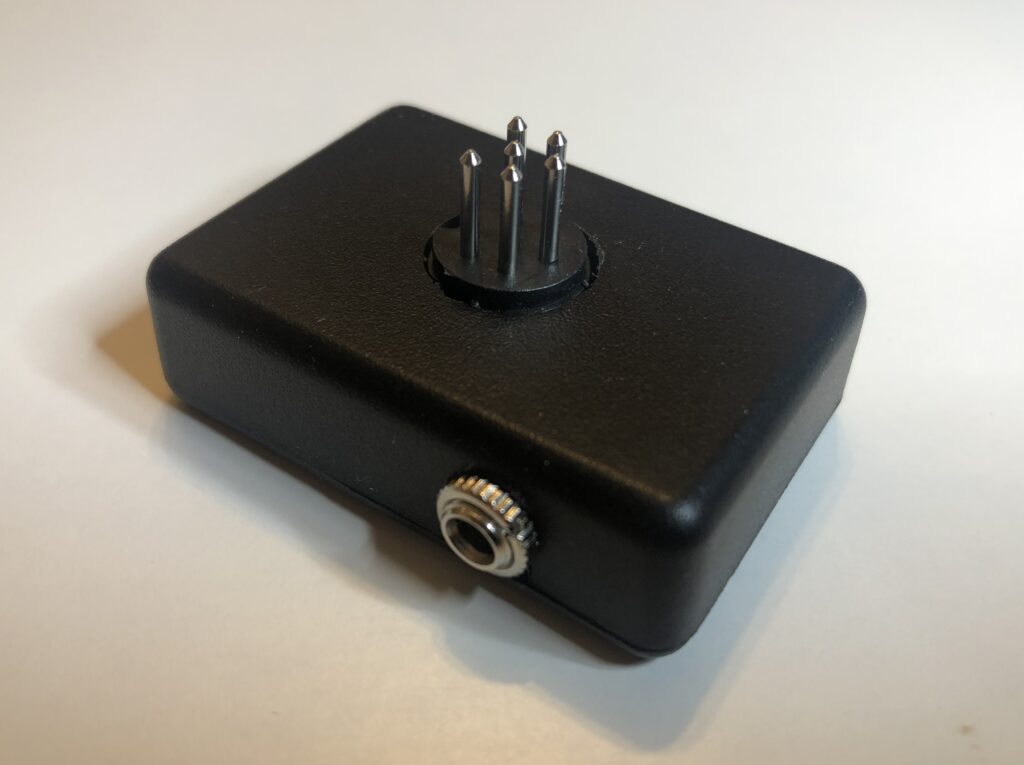
The device also has a 3.5mm MIDI TRS jack for MIDI Input. The mp-800 can be purchaes with or without a MIDI TRS Type A cable. You can connect this in two ways:
- Connect to MIDI OUT on your computer or MIDI host.
- Connect your JX-synth to your computer or MIDI host, and then connect the mp-800 to the MIDI THRU output on your JX.
Startup
Always connect the mp-800 BEFORE you turn on the synthesizer.
When you turn on the synthesizer, the mp-800 will blink it’s little LED in the small hole on the front.
The blinking tells you that it is in “configuration mode”. It will stay in this mode for a little time (startup timer), then it will stop blinking and turn to “normal mode”.
The mp-800 is receiving MIDI on channel 1 as default, but you can change this to any MIDI channel between 1 and 16.
In “normal mode” the LED will be lit for short periods of time when there is incoming MIDI on the correct MIDI channel. Most of the time it will not be lit.
Change the MIDI Receive channel
To change the MIDI channel, you must restart the device to get it into the blinking “configuration mode”.
Now it waits for MIDI Note on for key number 0 (lowest C) followed by key number 2 (lowest D). You may need to transpose your keyboard to be able to play these two low notes. You can also create a track in your DAW with these two notes following each other in time with some space between them.
When you have played the two correct keys, in the correct order, and before the startup timer expires, the LED will stop blinking and become lit all the time.
When the LED is lit continuously, the mp-800 is in “MIDI learn mode”. Now you can select the midi channel that you want in your DAW or keyboard and play any note. The mp-800 will “learn” the MIDI channel from the incoming MIDI Note on message and exit “MIDI learn mode” and turn to “normal mode”.
Factory reset
In “MIDI learn mode” there is a special key that will make a factory reset.
This key is the lowest F (key number 5).
The factory reset will clear all memories and settings to its default values.
When you press the F-key, it will still learn the incoming midi channel.
Preparations
Before you can start to use this solution you need to prepare some things:
- Connect the mp-800 to the Roland JX-8P (or JX-10 or MKS-70).
- Connect the mp-800 to your DAW or MIDI Host.
- Set the MIDI receive channel for the mp-800 (channel 1 by default).
- Configure your MIDI controller with the correct CC-number for each knob, fader and button. See the Appendixes for layout and CC numbers.
- Connect your MIDI controller to your DAW or MIDI Host.
- Configure your DAW or MIDI Host so that the MIDI CC messages from the MIDI controller is routed to the mp-800 MIDI input, and not to anything else. See the special note about Ableton Live below.
Your MIDI controller
The mp-800 is not that fun without a MIDI controller.
The bigger the better, because you want to be able to control all parameters of the synthesizer with it’s own knob, fader or button.
The Novation Launchcontrol XL a good choice, but many others will also work. You can always start with what you already have, and then expand later and get a bigger one.
Many DAW’s merges incoming MIDI from multiple MIDI inputs. Therefore you can also use two or more smaller controllers, where each controller controls a sub-part of the total parameters.
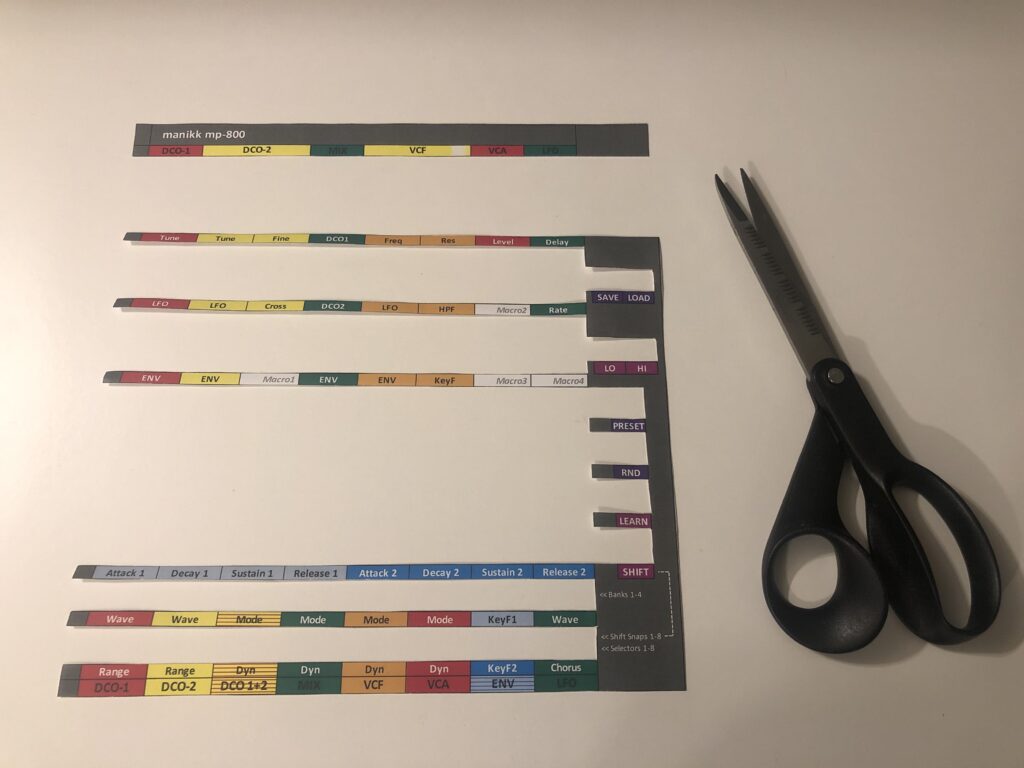
It is a good idea to make some overlay for your controller, so that you know what parameter each knob is changing. It makes it much easier and more fun.
On the website you can download a ready-made configuration file for the Novation Launchcontrol XL and an Excel file for printing out and making an overlay.
Note about Ableton Live
This note/tip is mainly for Ableton Live, but it is probably the same or similar behavior in other DAW’s also.
When you create MIDI tracks in Ableton, the MIDI input source is set to “All inputs”. That is not the best idéa when you work with MIDI controllers, because alla MIDI data is the fed out to all your MIDI tracks. It will be a mess because when you tweak anything on any MIDI controller it will be sent out to all your MIDI devices.
A better way to setup you Ableton MIDI tracks is to always select which MIDI device you want to use for each track. Most often this will be your MIDI Master keyboard only.
You need to create a separate MIDI track for the mp-800. You select the MIDI controller as the input, and for the output you select the MIDI interface and the channel where the mp-800 is connected.
Also turn on the “Monitor In” button så that you don’t need to have the track “record armed” for it to work.
Usage
When everything is correctly set up, you can use the MIDI controller to program your synth. Remember that you need to configure your MIDI controller with the correct CC-numbers for each knob and button first.
You can also use all the other features like, saving and loading your patches, recalling presets, twist your sounds with macros and snaps.
When your Roland synth has started up, you can press the “PARAMETER” button in the “EDIT” group of buttons. In the synthesizers “PARAMETER”-mode, you will be able to see which parameter you are editing in the display and also its value. This is especially good for parameters that you control from momentary buttons. Each click will cycle the current value to the next. For example waveforms will be displayed with their names in the display each time you press a parameter button on the mp-800.
Macros
A macro is a group of parameters that you control from one single CC. There is 8 predefined macros, and 8 user defined that you can create by yourself.
See Appendix C for CC numbers and a short description of what parameters that are included in the 8 predefined macros.
A macro is saved “globally” and can be used for all your patches, presets and the current patch that you are working with for the moment.
The macros is good for live expression in live performances.
Up to 4 parameters can be included in a macro. For each parameter you can set its highest and lowest value. If you set the highest to a lower value than the lowest, the behavior for that parameter will be inverted.
To use a macro, you just send the macro-CC to the mp-800, and it will make the magic with the parameters in the synth.
To create a macro you have to do the following:
- Send the CC for Macro Learn, with value 127.
- Send the CC for one of the 8 user defined Macros.
- Send the CC for the first parameter that you want to include. Lowest (Lo) will be set to 0 and Highest (Hi) will be set to 127 automatically.
- If you want to change the lo and hi for the parameter, you need to send the same CC again, with the new value that you want to have as lo or hi.
- Now when you have sent the CC for the parameter and it’s value, you can send the CC for “Macro Lo” or “Macro Hi” to adjust the range for the parameter.
- You can adjust and change the Lo and Hi for the parameter as long as you have not sent another parameter CC, because then you start learning the next parameter in the macro.
- Repeat the above for up to 4 parameters.
- You exit Macro learn mode by sending the Macro Learn CC with value 0.
It is recommended to use knobs or faders for macros, not buttons.
All the above can be done by pressing buttons and tweaking knobs on the MIDI controller. All this can be done from one single Launchcontrol XL for example.
If you have two MIDI controllers, you can dedicate the second one for the 8 user defined macros, the 8 predefined macros and the 8 user defined snaps. This works well with a Korg nanokontrol for example.
Snaps
A snap is a simpler form of macro. It is just a snapshot of the values for up to 4 parameters. When you execute the snap, these (up to) 4 parameters will be overwritten with the values from the snap.
It is recommended to use momentary buttons to execute snaps.
To create a snap you have to do the following:
- Send the CC for Macro Learn, with value 127
- Send the CC for one of the user defined snaps.
- Send the CC and value for the parameter that you want to include in your snap.
- If you send the same CC again with a new value, that new value will be used instead. This way you can adjust the value many times before you move on with learning the next parameter in the snap.
- When you send another parameter CC with value, you start learning the next parameter. 4 parameters maximum.
- You exit Macro learn mode by sending the Macro Learn CC with value 0.
All the above can be done by pressing buttons and tweaking knobs on the MIDI controller. All this can be done from one single Launchcontrol XL for example.
Presets
The mp-800 has 64 built in presets, organized in 8 banks with 8 patches each.
These patches can be used as they are, or you can use them as a startingpoint when editing and creating your own patches.
The first presets are very simple and are created mainly as “init patch” presets to get you going and creating new sounds from scratch.
You can recall preset patches in two ways:
The first and simplest is to send the preset recall CC with a value of 1 to 64. If you have a controller with 64 momentary buttons, you could for example configure each button to send this CC and the specific value for each button.
The second way is more manual, and can be used from the MIDI controller. if you use the same layout as in Appendix A – Layout. It is important to use this layout for the buttons, because the buttons will have multiple functions depending on which mode the mp-800 is in.
To recall a preset the “manual” way you have to do the following:
- Send the CC for Preset Select with value 127
- Send the CC for bank select with value 1 to 8 (or see Appendix A*)
- Send the CC for Snap select with value 1 to 8 (or see Appendix A*)
- You can repeat the bank and/or snap select to recall different presets.
- To exit the Preset select mode, you send the CC for Preset Select with value 0.
*NOTE! While in in Preset select mode, you can also use some parameter cycle CC’s instead of the bank select and snap select buttons. See Appendix A – Layout.
Save and load user patches
NOTE! Before you edit and save any patch it is best to start with a fresh patch by recalling a preset, loading a user patch or using the randomize function. This way you will hear what you are saving. The mp-800 can never “read” the parameters of the synthesizer, it can only send parameters to it. At startup there will therefore be a mismatch of the parameterdata in the synthesizer and in the mp-800. The original programmer had a “manual” button for this, that sent the state of the programmer to the synth, so that you would hear what you saw on the programmer panel. But the mp-800 does not have any knobs or buttons, it only receives CC from the outside. So to summarize: Always start with a known state when editing sound that you later will save, else it might not be the same sound that you hear when you load it later…
To load an user patch you can use CC 108 with a value from 1 to 32.
To save a user patch you can use CC 107 with a value from 1 to 32.
You can also use the “manual” mode to load and save patches. The manual mode works well from the MIDI controller.
To load a user patch manually you have to do the following:
- Send the Load Mode CC with the value 127
- Send a Bank Select CC with the value 1 to 4. If you skip this step bank 1 will be used.
- Send a Select CC (or Snap CC) with a value 1 to 8
- To exit Load Mode you send the Load Mode CC again with value 0.
Save works the same way except for that you use the Save Mode CC instead.
Make your own overlay for the controller
You can create and print your own overlay for your MIDI controller.
On the website you will find a zip-file with a configuration file for the Novation Launchcontrol XL and also an Excel-sheet with an overlay. There is also a configuration file for the Korg nanokontrol2 if you would like to use it as a Macro/Snap/Preset/Load/Save-controller.
The Novation Lauchcontrol XL has 8 user templates. You could use this function to have all the programming stuff in template 1 and then you can put all the macro and snap stuff in template 2.
Appendix A – Layout
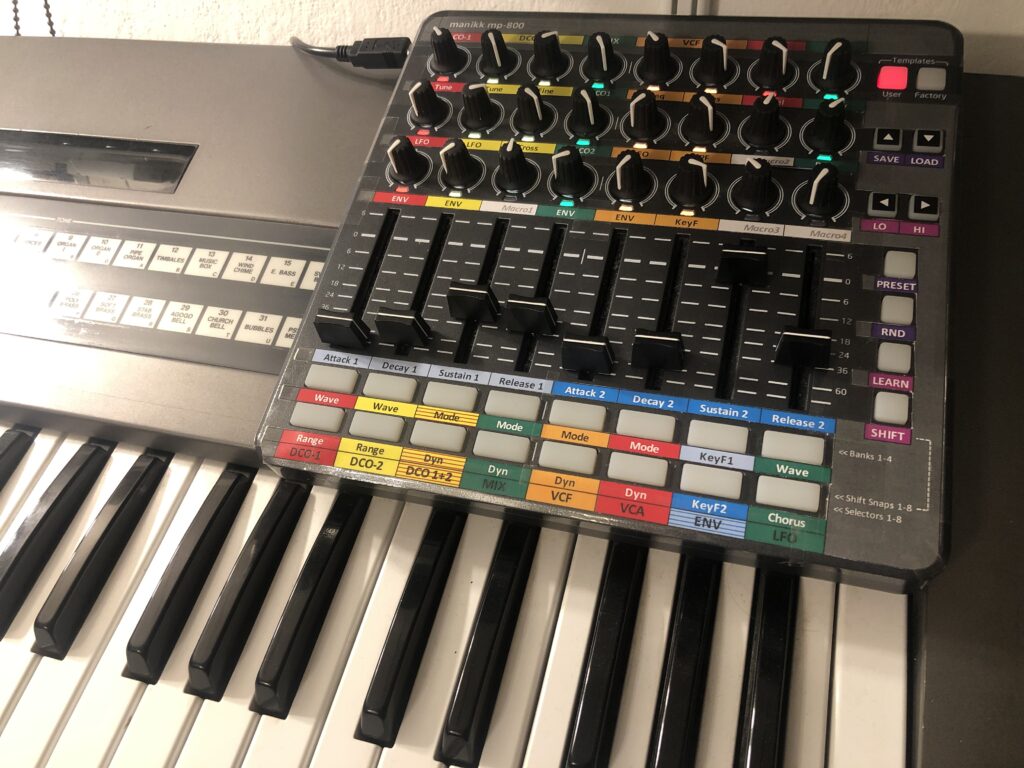
This is the recommended layout for the Novation Launchcontrol XL.
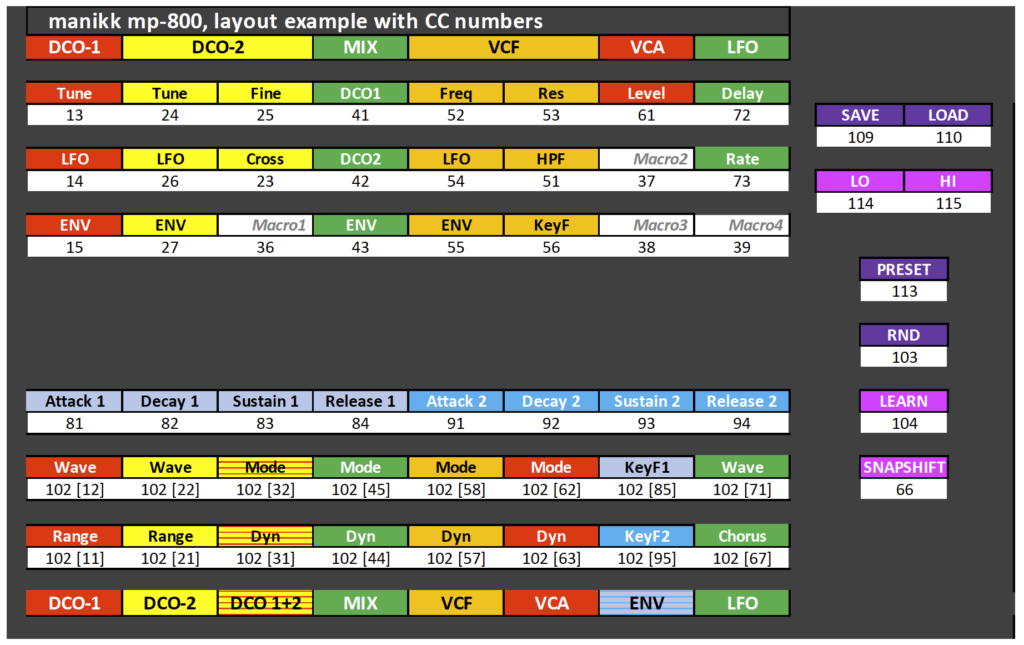
Note that the bottom parameter buttons have multiple functions depending on the current mode of the mp-800. See Appendix B.
It is very important to use this layout for the buttons on the two bottom lines, if you want to use the SNAPSHIFT button. See Appendix B.
The SNAPSHIFT lets you temporarily use the bottom buttons as Snap-buttons while holding the Shift-button. When you release the Shift-button the bottom buttons will become the ordinary parameter buttons again.
The layout files for the Novation Launchcontrol XL and the Excel-overlay can be downloaded from the website.
Appendix B – Multifunction buttons
Some CC’s (buttons) have multiple functions depending on the current mode of the mp-800.
In the layout above, the bottom two rows of buttons are used for parameter value cycle CC’s. It is exactly these 16 CC’s that have multiple functions.
NOTE! It is very important that buttons are placed according to the layout above, else the multi/overloaded functions does not make any sense.
Table of the multifunction buttons:
The CC number for parameter cycling is 102.
The buttons below should all send this same CC number but the value must be different for each button. The value should be the normal parameter CC number.
Example:
The normal parameter DCO1 Wave has the CC number 12. This CC takes a value between 0 and 127. Because the wave parameter is a parameter with 4 distinct steps, the value will be divided by four and values 0-31 will give the first waveform, 32-63 will select waveform number two and so on.
If you instead use the parameter cycling CC 102 and send a value of 12 (12 is the normal parameter number), the wave parameter will be cycled to the next distinct step, the next waveform. The cycle (stepped) parameters works therefore very well with buttons
| Param | Value | Normal | Save & Load | Preset | SnapShift |
| Wave DCO1 | 12 | Cycle | Bank 1 | Bank 1 | – |
| Wave DCO2 | 22 | Cycle | Bank 2 | Bank 2 | – |
| Mode DCOs | 32 | Cycle | Bank 3 | Bank 3 | – |
| Mode MIX | 45 | Cycle | Bank 4 | Bank 4 | – |
| Mode VCF | 58 | Cycle | – | Bank 5 | – |
| Mode VCA | 62 | Cycle | – | Bank 6 | – |
| KeyFol 1 | 85 | Cycle | – | Bank 7 | – |
| Wave LFO | 71 | Cycle | – | Bank 8 | – |
| Range DCO1 | 11 | Cycle | Select 1 | Select 1 | Snap 1 |
| Range DCO2 | 21 | Cycle | Select 2 | Select 2 | Snap 2 |
| Dyn DCO’s | 31 | Cycle | Select 3 | Select 3 | Snap 3 |
| Dyn MIX | 44 | Cycle | Select 4 | Select 4 | Snap 4 |
| Dyn VCF | 57 | Cycle | Select 5 | Select 5 | Snap 5 |
| Dyn VCA | 63 | Cycle | Select 6 | Select 6 | Snap 6 |
| KeyFol2 | 95 | Cycle | Select 7 | Select 7 | Snap 7 |
| Chorus | 67 | Cycle | Select 8 | Select 8 | Snap 8 |
Appendix C – MIDI CC Implementation Chart
The CC numbers for the parameters have the same numbers that are printed on the synthesizer front panel. All parameters except for the chorus that is moved from 64 to 67 because 64 was occupied by the Hold already.
| CC | Description |
| 1 | Modwheel (not used by mp-800 but used by the synth) |
| 2 | – |
| 3 | – |
| 4 | – |
| 5 | Portamento time (not used by mp-800 but used by the synth) |
| 6 | – |
| 7 | Volume (not used by mp-800 but used by the synth) |
| 8 | – |
| 9 | – |
| 10 | |
| 11 | CC_DCO1_RANGE, DCO1 Range |
| 12 | CC_DCO1_WAVE, DCO1 Waveform |
| 13 | CC_DCO1_TUNE, DCO1 Tuning |
| 14 | CC_DCO1_LFO, DCO1 LFO amount |
| 15 | CC_DCO1_ENV, DCO1 ENV amount |
| 16 | – |
| 17 | – |
| 18 | – |
| 19 | – |
| 20 | – |
| 21 | CC_DCO2_RANGE, DCO2 Range |
| 22 | CC_DCO2_WAVE, DCO2 Waveform |
| 23 | CC_DCO2_CROSS, DCO2 Cross modulation |
| 24 | CC_DCO2_TUNE, DCO2 Tuning |
| 25 | CC_DCO2_FINE, DCO2 Fine tune |
| 26 | CC_DCO2_LFO, DCO2 LFO amount |
| 27 | CC_DCO2_ENV, DCO2 ENV amount |
| 28 | – |
| 29 | – |
| 30 | – |
| 31 | CC_DCO_DYN, DCOs Dynamics |
| 32 | CC_DCO_ENVMODE, DCOs ENV mode |
| 33 | – |
| 34 | – |
| 35 | – |
| 36 | CC_MACRO_1, User defined macro |
| 37 | CC_MACRO_2, User defined macro |
| 38 | CC_MACRO_3, User defined macro |
| 39 | CC_MACRO_4, User defined macro |
| 40 | – |
| 41 | CC_MIX_DCO1, Mixer DCO1 level |
| 42 | CC_MIX_DCO2, Mixer DCO2 level |
| 43 | CC_MIX_ENV, Mixer ENV amount |
| 44 | CC_MIX_DYN, Mixer Dynamics |
| 45 | CC_MIX_ENVMODE, Mixer ENV Mode |
| 46 | CC_MACRO_5, User defined macro |
| 47 | CC_MACRO_6, User defined macro |
| 48 | CC_MACRO_7, User defined macro |
| 49 | CC_MACRO_8, User defined macro |
| 50 | – |
| 51 | CC_VCF_HPF, High pass filter |
| 52 | CC_VCF_FREQ, VCF Frequency |
| 53 | CC_VCF_RES, VCF Resonance |
| 54 | CC_VCF_LFO, VCF LFO amount |
| 55 | CC_VCF_ENV, VCF ENV amount |
| 56 | CC_VCF_KEYF, VCF Key follow |
| 57 | CC_VCF_DYN, VCF Dynamics |
| 58 | CC_VCF_ENVMODE, VCF ENV mode |
| 59 | – |
| 60 | – |
| 61 | CC_VCA_LEVEL, VCA level |
| 62 | CC_VCA_ENVMODE, VCA ENV mode |
| 63 | CC_VCA_DYN, VCA Dynamics |
| 64 | Hold (not used by mp-800 but used by the synth) |
| 65 | Portamento on (not used by mp-800 but used by the synth) |
| 66 | CC_SOSTENUTO_SNAPSHIFT, The SnapShift function shifts some of the parameter cycle buttons to Snap-buttons. See Appendix B. Value 127 = shift. Value 0 = exit shift. |
| 67 | CC_CHORUS, Chorus function |
| 68 | – |
| 69 | – |
| 70 | – |
| 71 | CC_LFO_WAVE, LFO waveform |
| 72 | CC_LFO_DELAY, LFO delay time |
| 73 | CC_LFO_RATE, LFO Frequency |
| 74 | CC_PREDEFINED_MACRO_1, VCF Frequency VCF Resonance (inverted) |
| 75 | CC_PREDEFINED_MACRO_2, VCF Frequency ENV2 Release |
| 76 | CC_PREDEFINED_MACRO_3, VCF Resonance High pass filter Chorus |
| 77 | CC_PREDEFINED_MACRO_4, DCO1 volume DCO2 volume (inverted) |
| 78 | CC_PREDEFINED_MACRO_5, DCO1 Wave DCO2 Wave DCO2 Crossmodulation DCO2 Finetune |
| 79 | CC_PREDEFINED_MACRO_6, DCO1 Range DCO2 Range Chorus (inverted) |
| 80 | CC_PREDEFINED_MACRO_7, LFO Rate VCF LFO amount (inverted) |
| 81 | CC_ENV1_ATTACK |
| 82 | CC_ENV1_DECAY |
| 83 | CC_ENV1_SUSTAIN |
| 84 | CC_ENV1_RELEASE |
| 85 | CC_ENV1_KEYF, Env 1 key follow |
| 86 | CC_PREDEFINED_MACRO_8, DCO2 LFO amount VCF LFO amount LFO Rate |
| 87 | – |
| 88 | – |
| 89 | – |
| 90 | – |
| 91 | CC_ENV2_ATTACK |
| 92 | CC_ENV2_DECAY |
| 93 | CC_ENV2_SUSTAIN |
| 94 | CC_ENV2_RELEASE |
| 95 | CC_ENV2_KEYF, Env 2 key follow |
| 96 | |
| 97 | |
| 98 | |
| 99 | |
| 100 | |
| 101 | |
| 102 | CC_FEATURE_CYCLE_PARAMETER Value should be a valid parameter number. The requested parameter will be “cycled” from 0 to max and then back to zero again. This is good for “stepped” parameters like, waveform, range, envmode, dynamics, HPF, chorus and so on. For these parameters it will step directly to the next value. For example from Range 16′ to 8′. |
| 103 | CC_FEATURE_RANDOMIZE Value 127= randomize all parameters. Other value will randomize a single parameter, if the value is a valid parameter number. |
| 104 | CC_FEATURE_LEARN Activates or deactivates the learn mode for macros and snaps. Value 127=Learn mode on Value 0=Learn mode off |
| 105 | CC_FEATURE_DEVICE_SEND_ALL Send all the parameters that are inside the mp-800 work memory to the synth. This is exactly like the “manual” button on the original programmer, but as the mp-800 does not have any knobs, you can not see what values all the parameters have. It is always better to start editing from a known patch state. A known patch state is accomplished with loading a preset or user patch first. Value 127=Send all internal parameters to the synth. |
| 106 | CC_FEATURE_SNAP_BUTTON Send this CC with a value of 1 to 8 for executing a stored snap. You will also use this CC when in snap learn mode to select which snap you want to learn. |
| 107 | CC_FEATURE_SAVE Send this CC with a value of 1 to 32 to save the current patch in work memory to non volatile memory. |
| 108 | CC_FEATURE_LOAD Send this CC with a value of 1 to 32 to load a user patch from non volatile memory into the work memory. |
| 109 | CC_FEATURE_SAVE_MODE Send this CC with a value of 127 to enter SAVE mode. In SAVE mode you can use the BANK SELECT CC (with value 1-8) and SELECTBUTTONS CC (with value 1-8) to select which bank and slot number to save the patch into. Exit with SAVE mode CC and value 0. |
| 110 | CC_FEATURE_LOAD_MODE Send this CC with a value of 127 to enter LOAD mode. In LOAD mode you can use the BANK SELECT CC (with value 1-8) and SELECTBUTTONS CC (with value 1-8) to select which bank and slot number to save the patch into. Exit with this LOAD mode CC again with value 0. |
| 111 | CC_FEATURE_SELECTBUTTONS Value 1-8 Used in LOAD, SAVE and PRESET modes to select the patch 1-8 in the selected bank. (The bank must always be selected first) You can also use the SNAP_BUTTON CC instead of this CC when the mp-800 is in the LOAD, SAVE or PRESET mode. |
| 112 | CC_FEATURE_PRESET Send this CC with a value of 1 to 64 to load a preset patch into the work memory. |
| 113 | CC_FEATURE_PRESET_SELECT_MODE Send this CC with a value of 127 to enter PRESET mode. In PRESET mode you can use the BANK SELECT CC (with value 1-8) and SELECTBUTTONS CC (with value 1-8) to select which bank and slot number to recall the preset from. Exit with this PRESET mode CC again with value 0. |
| 114 | CC_FEATURE_MACRO_LEVEL_LO For this CC to work, the mp-800 must be in Macro learn mode, and you must have selected which macro to learn. Then you can edit a parameter that you want to include in your macro. The last value of the parameter you are editing are memorized by the mp-800. If you now send this MACRO LEVEL LO CC, you will set the lower limit for the parameter. Example: you edit the VCF Frequency and set it to 34. Then you send this LO CC. When you now use your macro and set the macro knob to zero, the CVF Frequency will be set to 34. If you set LO to a higher value than HI, the scale will be inverted for this parameter in the macro. |
| 115 | CC_FEATURE_MACRO_LEVEL_HI For this CC to work, the mp-800 must be in Macro learn mode, and you must have selected which macro to learn. Then you can edit a parameter that you want to include in your macro. The last value of the parameter you are editing are memorized by the mp-800. If you now send this MACRO LEVEL HI CC, you will set the higher limit for the parameter. Example: you edit the VCF Frequency and set it to 79. Then you send this HI CC. When you now use your macro and set the macro knob to its max of 127, the CVF Frequency will be set to 79. If you set HI to a lower value than LO, the scale will be inverted for this parameter in the macro. |
| 116 | CC_FEATURE_BANK_SELECT Value 1-8 Used in LOAD, SAVE and PRESET modes to select the bank 1-8. (The bank must always be selected before the slot.) |